| CYLINDER & CYLINDER-HEAD SERVICE 12)Cylinder-head Removal. A) Place machine on cycle stand. B) Remove Fuel tank. C) Remove Exhaust pipe as one-unit. D) Remove spark plug. E) Remove points cover. F) Remove cam-cover (tach drive cover if fitted). G) Select 5th-gear, rotate engine to "TDC" compression.... taking note that; the points are open, and the "dots" on the camshaft bevel-drive gears are lined up. This will speed your reassemble time. H) Remove Carb or carb-slide/cable. I) Remove the four cylinderhead bolts (17mm socket). J) Carefully lift cylinderhead up and off. Some slight shaking may be needed so as towershaft coupler will release. K) Using two 10mm bolts approx 10-12" long (DO NOT USE ORIG CYL-HEAD BOLTS FOR THIS), slide both thru rear set of bolt holes, then place head onto of vise, with bolts in jaws and tighten. L) Remove rocker covers as needed. M) With work completed on head, refit rocker covers. N) Align "dots" on camshaft bevel gears. 0) Check/replace oil feed o-ring on cylinder, lightly grease. P) Hopefully you have not rotated the engine since the cyl-head's removal. If so, Rotate engine to "TDC" compression, points open. Make sure lower bevel couple "half-moon" is 180-degrees from that of bevel drive shaft on head. Q) Lightly grease lower end of bevel drive housing tube. R) Refit cylinderhead, making sure couple has engaged. To help this along, you may have to rotate the cam gear bevel gears back and forth until head drops down in place. DO NOT FORCE! S) Lightly grease cylinder bolts and refit. T) Tighten bolts in a cross-pattern, torque bolts to 25-30 ft., pounds each in cross pattern. U) Reverse "A" thru "H". NOTE: Apply Anti-seize or grease on Exhaust collar nut threads, then safety wire once tight. Read: "Important Engine Notes". 13) Cylinder & Piston Removal. A) Complete #12A thru J. B) Holding the cylinder with two hands, slowly lift up-wards, once cylinder is clear of case, place a rag around con-rod so as to stop possible broken piston rings from falling in. C) Remove cylinder 100%. If fitted with Teflon-buttons, make sure they do not fall into the engine, or across your floor. D) Remove piston as needed. To remove, remove Teflon-buttons or circlips. Pin then should be pushed out only far enough to release piston from con-rod. NOTE: Make sure which way the piston came out, most are marked, though some are not. The smaller of the two piston pockets is the exhaust (front). E) Check for piston and ring wear/damage, replace as needed. NOTE: When replacing rings, YOU MUST check ring end-gap in cylinder. Hone Cylinder with Med or Med-Fine stones or glaze cutter only. Lightly spray cylinder with WD40. F) Soak new base gasket in water for approx 2 to 4 minutes, then fit to cases with NO sealer. G) Refit wrist-pin 1/4 way into piston. H) Carefully fit piston/rings into cylinder. I) Holding Cylinder/Piston over rod, push wrist-pin home 100%. J) Refit Teflon-Buttons or remaining circlip (Rag over cases?). K) Remove rag from case, slowly push cylinder down into position. L) Refit Cylinderhead assy., Complete #12N thru U. When changing pistons, DO NOT just fit a new piston and start engine! YOU CAN CAUSE DAMAGE. Each WCBR piston is machined and fitted to each engine, no two are alike. This is the case in many racing engines. It is very wise to order spare piston/ring sets prior to machine delivery. When fitting an unknown piston, you will have to "clay" it, meaning; Fit the new piston with only one ring, place modeling clay in small balls on the dome (both valve pockets in 3-places, dome, dome sides, squish band). Lightly lube w/WD40, spray head w/WD40 and refit. Fit two (2) bolts and torque; rotate the engine (if possible) through all 4-strokes, then return back to "TDC" compression. Remove head, check/measure clay depths, and machine as necessary. It may be necessary to repeat this a number of times before the piston is ready for use. |
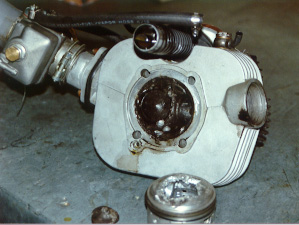 |
| Left: A dropped exhaust valve cut short Bret's race weekend... and it was a new Genuine Ducati valve with no mileage on it. |